Guide to create full featured blog site with Astro
Overview
Infrastructure
For infrastructure I determined following requirements:
- Azure Static Web Apps for frontend
- Azure Functions for backend
- Azure Table Storage for simple tables
- Custom domain names for both frontend and backend
- SSL certificates for custom domain names
- Automated deployment using Azure DevOps
- Authentication capabilities through Azure AD/Entra
Azure Static Web App
Azure Static Web App can be created in Azure portal. You may also use built-in Azure Functions or so-called managed functions.
If you decide to use managed function, you can get advantage of following:
- No need to configure CORS as managed functions use
<domain>/apiendoint. In other words calling function from Javascript will result in same origin call. - Deployment pipeline covers both web app and function app.
However, I would not recommend using managed functions, because you will not have full control over your function app. Additionally you will not be able to use table service that would be useful for storing page likes and other small amounts of data. Instead, you can create a separate function app that utilizes consumption plan. Of course, choice is yours.
CORS configuration is not difficult and deployment pipeline can be configured in 10-15 minutes. Further in the article, it is assumed that we will use separate function app.
Azure Function service plan
For Azure Functions I am using consumption plan. It is the most cost-effective plan for functions that are not used frequently. As my objective is to use function for storing and showing page likes, I expect that function will be called only when user clicks on like button. How do I know, maybe nobody will like my blog? ;) In that case, costs will be managed.
Storage Account
Azure Storage Account is used for Azure Functions. It is used to store function app code and configuration. It is also used to store function app logs. You can use Azure Storage Explorer to view logs and other files stored in the storage account. Additionally, you may use table service like “mini-database”.
Custom domain names
Azure Static Web apps and Azure Functions have excellent support for custom domain names. By default, Azure provides you with default domain
names for your web app and function app. However, you can add your custom domain names to your web app and function app. Azure is polite enough
to provide you with clear instruction how to configure your custom domain names withing domain registrar management console.

I have used namecheap.com to buy a domain name and configured it using provided instructions. Azure validates your ownership of the domain name and configures applications and functions to use it.
Note: existing default domain still remains operational, so you can use it as a backup.
Certificates
Azure Static Web Apps provides free SSL certificates for your custom domain names. You can use these certificates to secure your web app.

Same situation is with Azure Functions, where you can use free SSL certificates to secure your function app. Nothing additional needs to
be done. Simply enable it in the Azure portal.

Application Insights
Create an Application Insights resource in Azure portal in advance. That way you will be able to attach same resource to both static web app and function app. This will allow you to monitor both applications in one place. Related log analytics workspace will be provisioned for you automatically.
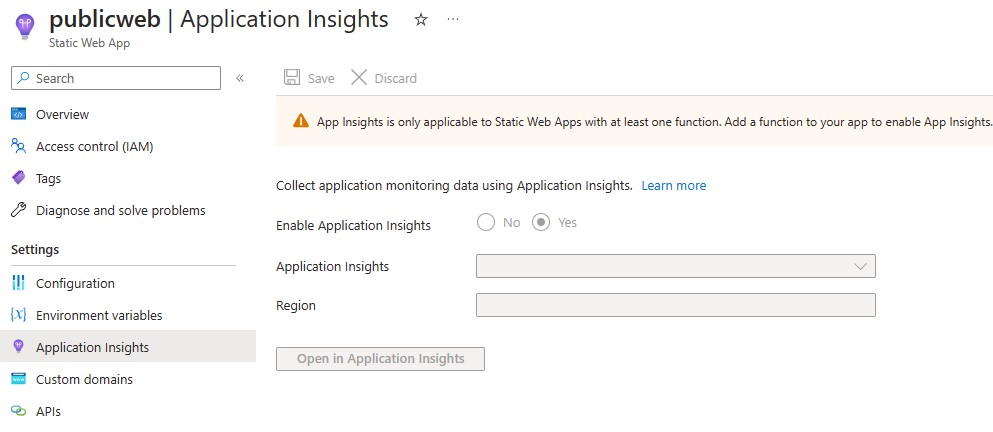
Note: Application Insights applies only to Azure Functions and not to Azure Static Web Apps itself. You must have at least one function in you static web app to be able to attach Application Insights to it.
Backend
I determined following requirements for my backend:
- No route prefix in API calls
- No ASP.NET Core integration
- Ability to work with Azure Table Storage
- Ability to deploy using Azure Pipelines
Route prefix
As my API is in a separate function app, I selected custom domain name in a form api.<domain>.net, while my app is deployed on www.<domain>.net.
This way I do not need to have any route prefix in my API calls. I can simply call
api.<domain>.net/likes to get likes count.
To disable route prefix you need to modify host.json file in your function app. Add following line to the file:
{
  "version": "2.0",
  "extensions": {
    "http": {
      "routePrefix": ""
    }
  }
}
ASP.NET vs Built-in model
First of all you need to take into account following choices:
- Hosting model. Most likely you will choose isolated model, as it is more secure and scalable.
- Language that will be used for Azure Functions. I will use C# for my functions.
- .NET version. I will use .NET 8 for my functions.
- ASP.NET Core or Built-in model. I will use built-in model for my functions.
- Deployment method. Tools, managed, or Azure DevOps Pipelines/GitHub Actions. I will use Azure DevOps for my deployment.
Hosting model
For C#, you only will have a choice, if you are using .NET 6 as documented in
versions support by runtime.
You project will need Worker and Worker.SDK packages. Project file should look something like this:
  <ItemGroup>
    <PackageReference Include="Microsoft.Azure.Functions.Worker" Version="1.21.0" />
    <PackageReference Include="Microsoft.Azure.Functions.Worker.Sdk" Version="1.17.2" />
    <PackageReference Include="Microsoft.Azure.Functions.Worker.Extensions.Http" Version="3.1.0" />
    <PackageReference Include="Microsoft.Azure.Functions.Worker.Extensions.Tables" Version="1.3.0" />
  </ItemGroup>
For .NET 6 you can choose between isolated and in-process hosting models. Choose isolated and use .NET 8, if possible.
Language
One of excellent features of Azure Functions is that you can use multiple languages to implement your functions. My choice is C#, and much of this
article is related to C# functions, but you have support for JavaScript, TypeScript, Python, Java, and PowerShell. For C# you also have an
option to use C# script (.csx) files.
.NET version
You should at least target .NET 6. As .NET 8 is latest LTS version and has good support across Azure services, my choice is .NET 8.
ASP.NET Core or Built-in model
To enable ASP.NET Core integration, you need to do 3-4 things:
- Add
Microsoft.Azure.Functions.Worker.Extensions.Http.AspNetCorepackage to your project. - Update worker packages to latest versions.
- Use specific HostBuilder procedure - use
ConfigureFunctionsWebApplication()instead ofConfigureFunctionsWorkerDefaults(). - Update HTTP-triggered functions to use the ASP.NET Core types.
You can read the details from the link above. I can tell that ASP.NET Core gives you more flexibility and options. In built-in model you have to do everything yourself. Not a big deal for simple, small amount of functions.
Deployment method
This is about settings in your function’s so called Deployment Center. You can choose between following options:
- Deployment managed by App Service.
- Deployment using Azure DevOps Pipelines or GitHub actions.
- Manual deployment using Visual Studio/VS Code/Azure Functions tools.
Managed deployment integrates with repos and monitor them for changes. When changes are detected, deployment is triggered. Theoretically, you can connect Azure Repos, however, in reality it does not work - you are directed to use Azure DevOps pipelines. In other words only GitHub is supported.
In my case, I want to have control of how my function is being built and deployed. So this suits me well. I will use Azure DevOps pipelines.
ReadyToRun: Improved cold start
When using consumption plan for Azure Functions, you may experience cold start issues. This is because functions are not running all the time. When you call a function, Azure needs to start it first. This may take some time. To improve cold start time, you may use Premium plan for Azure Functions. However, this plan is more expensive than consumption plan.
Instead there is a feature called ReadyToRun. This feature precompiles your functions and reduces cold start time. You can enable this feature by providing R2R (aka ReadyToRun) binaries. It is similar to AOT (Ahead of Time) compilation.
  <PropertyGroup>
    <TargetFramework>net8.0</TargetFramework>
    <AzureFunctionsVersion>v4</AzureFunctionsVersion>
    <RuntimeIdentifier>win-x64</RuntimeIdentifier>
    <PublishReadyToRun>true</PublishReadyToRun>
  </PropertyGroup>
Build and Deploy using Azure Repos
Ok. So to set up pipelines, you will need to do following:
- Create two repos - one for SWA and other for FA. Commit and sync your SWA and FA code respectively.
- Create a two pipelines in Azure DevOps - one for SWA and other for FA.
- For SWA pipeline, add task to update Node version to 20.x. This is because Astro requires Node 18.14.1.
- For SWA pipeline, add build version naming. This is because SWA is sensitive to how you name your build.
- For SWA pipeline, add SWA token.
- For SWA pipeline, you need to use
ubuntu-latestvmImage.
Here is how my SWA pipeline looks like:
name: $(SourceBranchName)_$(Date:yyyyMMdd)$(Rev:r) # customize build name format

pr:
  branches:
    include:
      - main
trigger:
  branches:
    include:
      - main

jobs:
- job: build_and_deploy_job
  displayName: Build and Deploy Job
  condition: or(eq(variables['Build.Reason'], 'Manual'),or(eq(variables['Build.Reason'], 'PullRequest'),eq(variables['Build.Reason'], 'IndividualCI')))
  pool:
    vmImage: ubuntu-latest # this is needed for SWA and all node tools
  variables:
  - group: Azure-Static-Web-Apps-<TOKEN>-variable-group # TOKEN is your SWA TOKEN
  steps:
  - task: UseNode@1 # required to use Node 20.x
    inputs:
      version: '20.x'
      checklatest: true
  - script: echo '$(Build.BuildNumber)' # outputs customized build number
  - checkout: self
    submodules: true
  - task: AzureStaticWebApp@0
    inputs:
      azure_static_web_apps_api_token: $(AZURE_STATIC_WEB_APPS_API_<TOKEN>) # token is your SWA token
###### Repository/Build Configurations - These values can be configured to match your app requirements. ######
# For more information regarding Static Web App workflow configurations, please visit: https://aka.ms/swaworkflowconfig
      app_location: "/" # App source code path
      api_location: "" # Api source code path - optional
      output_location: "dist" # Built app content directory - dist for Astro
      app_build_command: "npm run build" # The build command for your app
###### End of Repository/Build Configurations ######
Now, let’s see how FA pipeline looks like. I need to adjust following in boilerplate pipeline created by Azure DevOps:
- Add .NET Core SDK installation task. SDK
dotnetcommands will use latest installed version. List of versions can be found in releases index. - When running the pipeline, pay attention. You may be asked for permission to deploy. You need to grant it.
# .NET Core Function App to Windows on Azure
# Build a .NET Core function app and deploy it to Azure as a Windows function App.
# Add steps that analyze code, save build artifacts, deploy, and more:
# https://docs.microsoft.com/en-us/azure/devops/pipelines/languages/dotnet-core

trigger:
- main

variables:
  # Azure Resource Manager connection created during pipeline creation
  azureSubscription: '<SUBSCRIPTION-GUID>' # GUID of your subscription

  # Function app name
  functionAppName: 'fn-devdvsion-api'

  # Agent VM image name
  vmImageName: 'windows-2019' # windows-latest may work as well

  # Working Directory
  workingDirectory: '$(System.DefaultWorkingDirectory)/'

stages:
- stage: Build
  displayName: Build stage

  jobs:
  - job: Build
    displayName: Build
    pool:
      vmImage: $(vmImageName)

    steps:
    - task: UseDotNet@2
      displayName: 'Install .NET Core SDK'
      inputs:
        packageType: 'sdk'
        version: '8.0.203' # .NET 8 LTS version
        installationPath: $(Agent.ToolsDirectory)/dotnet
    - task: DotNetCoreCLI@2
      displayName: Build
      inputs:
        command: 'build'
        projects: |
          $(workingDirectory)/*.csproj
        arguments: --output $(System.DefaultWorkingDirectory)/publish_output --configuration Release

    - task: ArchiveFiles@2
      displayName: 'Archive files'
      inputs:
        rootFolderOrFile: '$(System.DefaultWorkingDirectory)/publish_output'
        includeRootFolder: false
        archiveType: zip
        archiveFile: $(Build.ArtifactStagingDirectory)/$(Build.BuildId).zip
        replaceExistingArchive: true

    - publish: $(Build.ArtifactStagingDirectory)/$(Build.BuildId).zip
      artifact: drop

- stage: Deploy
  displayName: Deploy stage
  dependsOn: Build
  condition: succeeded()

  jobs:
  - deployment: Deploy
    displayName: Deploy
    environment: 'development'
    pool:
      vmImage: $(vmImageName)

    strategy:
      runOnce:
        deploy:

          steps:
          - task: AzureFunctionApp@1
            displayName: 'Azure functions app deploy'
            inputs:
              azureSubscription: '$(azureSubscription)'
              appType: functionApp
              appName: $(functionAppName)
              package: '$(Pipeline.Workspace)/drop/$(Build.BuildId).zip'
Now you can use Azure DevOps for free. However, what you will need is a build agent. You can use Microsoft-hosted agents, but they are not free.
To get free build agent, you can have to ask for free grant. You can do it by navigating to Azure DevOps | Organization Settings | Billing and clicking
MS Hosted CI/CD link.
Here you will be presented with note explaining how to request free grant. In couple of business days you may get your free agent. Free agent gives you 1800 minutes
of agent time per month.
GitHub has the similar story. In the mean time you can always publish apps using your tools.
Development
Frontend and Astro
Static web apps
Headers on Azure Static Web Apps
Response caching
Azure Functions
Headers on Azure Functions
I am adding response headers before returning response from my function. I am returning two headers: Cache-Control and Content-Type.
        [Function(nameof(Likes))]
        public async Task<HttpResponseData> Run(
            [HttpTrigger(
                AuthorizationLevel.Anonymous,
                "get", "post",
                Route = "likes"
            )] HttpRequestData req)
        {

            //......
            // function content ommitted for brevity
            //......

            // Return the likes count and add headers
            var _response = req.CreateResponse(HttpStatusCode.OK);
            _response.Headers.Add("Cache-Control", "no-cache");
            _response.Headers.Add("X-Content-Type-Options", "nosniff");
            await _response.WriteAsJsonAsync(new LikesResponse { Likes = likes });

            return _response;
        }
WriteAsJsonAsync writes the specified value as JSON to the response body. The response content-type will be set
to "application/json; charset=utf-8".
CORS configuration
CORS configuration is controlled in Azure Portal. You can add allowed origins. You can also enable/disable credentials.

Tools
Here is the toolset that I used for development:
| Tool | Type | Purpose |
|---|---|---|
| Visual Studio Code | Code editor | Used to develop Astro files, CSS and JavaScript, Azure Functions C# code. Note: Visual Studio is much better for C#. |
| Azurite | Azure Storage emulator | Debugging Azure Functions locally. |
| Azure Storage Explorer | Azure Storage management tool | Analyze storage emulator tables data. |
| Static Web Apps CLI | Static Web Apps management tool | Initialize, configure and debug SWA. |
| Azure Functions Core Tools | Azure Functions management tool | Initialize, configure and debug functions. |
| C# extension for Visual Studio Code | C# language support | Develop Azure Functions. |
| YAML extension for Visual Studio Code | YAML support | Used to write Azure DevOps pipelines. |
| XML extension for Visual Studio Code | XML support | Used to write Azure Functions project files. |
| MDX support | Markdown support | Used to write blog posts. |
| Azure extension for Visual Studio Code | Azure management tool | Manage Azure resources. |
| Azure DevOps | CI/CD tool | Build and deploy SWA and Functions. |
| Paint.net | Image editing tool | Create AVIF images. Better than JPG. |
| Microsoft Edge Dev Tools | Web issues analysis | Console and problems is very useful in analyzing header and HTML tags issues. |
All tools are free to use.
Conclusion
Combination of SWA+FA+Astro is a powerful toolset for building modern and cost effective blog site. As a result you will get automated and easy to maintain blog site on secure platform.
Here is my evaluation on various features that I used, their status and implemention difficulty. This is my experience - it is not about any of technologies that I used:
| Feature | Implementation status | Difficulty |
|---|---|---|
| Blog articles list | Done | Medium-High |
| Centralized navigation header | Done | Medium-High |
| Centralized footer | Done | Medium |
| Latest articles | Done | Low |
| Side bar links | Done | Medium-High |
| Likes counter | Done | High |
| Article tags | Done | Medium-High |
| Support for Markdown | Done | Low |
| Dynamic metadata in frontmatter | Done | Medium |
| Support for MDX | Done | Low |
| Support for MD images | Done | Low. Built-in Astro implementation is poor. |
| Support for MD tables | Done | OOTB |
| Support for MD HTML | Done | OOTB. Lowercase should be used. |
| Responsive images | Done | Just use AVIF and responsive layout. |
| Image zoom | In progress | |
| Custom components | Done | OOTB |
| Custom layouts | Done | OOTB |
| Custom CSS | Done | Medium |
| Custom scripts | Done | Low |
| Custom fonts | Done | Low |
| Syntax highlighting | Done | Based on Shiki library, which is not the best, but ok. |
| Copy code button | Done | Medium |
| Support for SEO | In progress | |
| Article table of contents | In progress | |
| CORS configuration | Done | Medium |
| SWA cache control | In progress | Low |
| Function app cache control | Done | Low |
Overall I am satisfied with the result and will stay with this setup for some time. I will continue to improve my blog site and will share my experience with you.
- Nasty errors in Azurite Azure Blob Storage emulator
- Guide to create full featured blog site with Astro
- Configuring Azure Static Web Apps with Astro
- Partitioning questions in Azure Stream analytics and Event hub
- Implementation practice for IAM and provisioning automation